Hello, everyone! In last week’s article on 3d printing, I mentioned that you should try to go for generic pieces before specialized, focusing on basic walls and floors for your games before detail features like statues, doors, windows, or elevation changes. This rule of thumb may sound counterintuitive for an article about 3d printed terrain, but if you can get away with a non-printing solution for a unique situation, you should try that solution first. In the spirit of the clickbait-y title of the article, the following are a few quick-and-dirty techniques I’ve used to supplement my set of tiles which, at this point, is made entirely of walls, floors, and a few workhorse pieces of scatter terrain.

Table of Contents
1. Index Card Wall Features
One of the easiest ways to add some pizazz to a dungeon room is to decorate it with doors, windows, really anything to break up uniform walls. Using some blank 3×5 notecards, you can slip room features over an undecorated wall without spending a lot of time making additional game pieces. If you’re using completely blank notecards like myself, you can also hide notes on the back facing the wall! You could fill the wall side with the results of a successful perception check, reminder notes to yourself for detailed descriptions, or even a second drawing of the object(a door which opens, a lever pointed up or down, or a lit/unlit torch immediately come to mind).
Other Ideas
Here are some other ideas to add new wall features to your tiles, arranged from least preparation to most:
- You can use poster putty to affix these wall details to your tiles temporarily, or you could skip this step entirely to make your pieces easier to rearrange quickly.
- If you’re confident in your folding abilities, and that your players won’t poke your terrain without your say-so, you could also use folded index cards to indicate where a movable wall might be situated, sliding it over a printed wall when your players figure out how to open it.
- I picked index cards because they’re the easiest to use to improvise details. If you’re not a fan of paper features over your nicely painted terrain tiles, there are some alternative materials you could use – consider getting some durable clear plastic(I like the kind you can easily cut, which is used in most blister packaging) and a couple black or colored sharpies. The translucency will allow you to place the new features without having to obscure as much of your paint job.
- If you want to go even further in detail, you could look for Shrinky Dinks at your local stores! These plastic sheets shrink when heated in the oven, allowing you to cram a bunch of detail into a small piece easily. They’re slightly more expensive, but you can also find sheets of Shrinky Dinks material which can be used with an inkjet printer to print photos of dungeon features you like.
- If you find yourself using a feature over and over again(doors, windows, etc.), don’t feel that you have to print a full tile! Find a .stl file of a door or window that you like, and print a set that you can paint and use over and over. Modularity is key when making a set of these tiles.

2. Found Material Floor/Ground Features
You can get a lot of mileage out of your tiles, but sometimes, you may find that they won’t communicate exactly what you want – maybe there’s a pool of bubbling magma in the center of this dungeon room, or perhaps you want a grassier terrain for an outdoor encounter. Like the index card wall details, consider laying flat pieces of paper or felt on or under your tiles to represent different terrain types – some cheap felt sheets from somewhere like Walmart will run you less than $10 and can add a splash of color and variety to your game’s encounters.
Other Ideas
- Look at your local craft store for colored fake fur fabric in blues or greens(or different colors for more magical locations) – fake fur would make great tall grass for outdoor scenes, and you could trim it down with scissors to a more playable height if it’s too long.
- If you print your scatter terrain with rafts as I do, you’re bound to have some flat, natural shapes which you can reuse as new features. Paint them up to look like liquids or different terrain types.
- If you’re feeling particularly ambitious, try texturing the raft with mod podge or resin to add a little depth. Remember – you don’t have the 3-dimensionality of your tiles to work with, so use any small details you can to make the piece convincing. You can draw simple forced perspectives using acrylic paints, then add the layer of mod podge to distort it, also adding a barrier between your eyes and the actual object.
- To sell the effect, focus on making the transition between two types of terrain natural – glue some sand or aquarium gravel to the edges of your features to cover the seam between the terrain types.
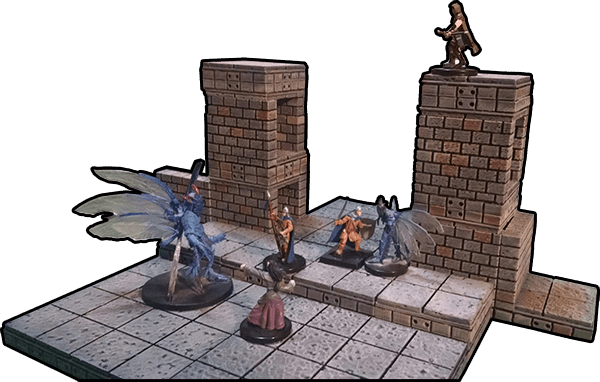
3. Elevation By Stacking
By far, the most impressive aspect of having printed dungeon tiles like these is the element of height compared to the traditional 2-dimensional maps. When in an outdoor scene or one with a high ceiling, you can take advantage of the sturdiness of wall tiles to make elevation changes by stacking upside-down tiles on top of properly placed ones. You can cap the tops of these structures with regular floor tiles to make buildings with flat roofs. You can also make smaller steps and changes in elevation by stacking your floor tiles.
Other Ideas
- Designers often make risers which are meant to be placed under dungeon tiles for changes in elevation, if you’re looking for further modular parts to print out. However, if you’re completely covering these parts in the scenes you’re building, consider the much faster and time-honored tradition of using cardboard boxes or thick books(gee, I wonder where tabletop RPG players would find those) as risers.
- Using some sky blue or black felt underneath your dungeon tiles, you can also imply to your players that the tiles you’ve laid down are elevated for scenes in a high-rising tower or building, or a chasm cutting through a dungeon floor.

4. “Inanimate” Objects/Statues
If you’re anything like me, you probably have a lot of unpainted minis just begging to make an appearance at your game table. One of the unexpected benefits of having so many miniatures is that you can place them as statues in a scene to immediately add variety to the environment. Because they’re still in scale with player minis, they also play into classic player paranoia – surely these statues wouldn’t be in the encounter if they weren’t going to rear up and attack, right? (Then, when your players have gotten used to seeing statues as decorative terrain features, go ahead and throw an animated statue at them to start the paranoia cycle all over again).
Other Ideas
- If you like to kitbash or customize your gaming minis, you probably have a collection of spare arms, weapons, and other rejected bits and pieces. These chunks can make good broken-off fragments of statues, or, if you’re looking for slightly more morbid terrain, you can paint these limbs with a gory color scheme and glue them to a reusable, nightmarish floor feature.
- To make the statues less “realistic” temporarily, you could consider using a material like silly putty to blend the miniature’s bottom into the base, making it more of a carved sculpture in progress. The putty would also have the benefit of being slightly sticky, enough to hold an unpainted mini in place.
- Black Magic Craft has a great video on painting minis with a convincing bronze patina for an aged statue look, if you’d prefer not to use unpainted elements in your games.

5. Non-Tile Scatter Terrain Tells a Story
Scatter terrain in an otherwise-simple room will give your players a lot of room to imagine additional details. When you place scatter terrain onto your tiles, you’ll accomplish two effects: You’ll break up lines of movement and sight in otherwise-spacious areas, and you’ll make the combat scene feel more dynamic. A set of stalagmites without any other identifying features can encourage players to imagine more natural cave elements, where a set of orderly stacked crates will imply a methodical arrangement(both together might imply that the crates were stashed in a cave to remain hidden). While it might be tempting to print tiles with fixed features, try to avoid it when possible – the ability to place the scatter terrain yourself on a board lets you finagle its position with just your hands and eyes without forcing you to always have an element snapped to a grid line.
Other Ideas
- You could make some quick columns for scatter terrain using an index card and a little bit of tape – fold your index card in quarters, and tape it to lie in a square tube. You could draw brickwork on the index card the same way I did above for my door, or you could draw any feature there. Since a 3×5 index card would fold into a 1.25″ square, you could place it on the intersection of two grid lines to make it take up a 2×2 space or over the center of a grid square for a 1×1 square(with only about an eighth of an inch of adjacent squares covered)
- Grab some neat-shaped rocks from outside(that weird place with the big yellow ball up high). Rocks, strangely enough, have the benefit of looking like rocks without any additional painting and come in a wide enough variety that you can mix and match for various scenes. I wouldn’t recommend being too rough with them – while I doubt you’re going to damage a rock by accident, they could easily damage more fragile minis or terrain pieces if you aren’t careful.
Well, there you have it – a bunch of ideas to get more mileage out of your tiles. Hopefully these suggestions help you to cut down on the time you spend printing redundant parts, so that you can move on to what you really want to use your 3D printer for, the scenes that these tricks just won’t do justice – setpiece parts for your dramatic combat scenes and enough modular parts to quickly build the rest.
Discover more from TBM Games
Subscribe to get the latest posts sent to your email.